Wednesday, December 6, 2017

My Favorite Things: Ski-sons Greetings

Hello everyone!
Hope your week has gone well so far.  Today I will be featuring stamps and stencils from MFT and Honey Bee Stamps.  I love stencils that you can build a scene with; Honey Bee and MFT have been releaseing awesome stencils that does this.   I used MFT’s Drift and Hills stencil as well As Honey Bee’s Outdoor Scene Builder stencils.  Honey Bee has many scene building stencils that are wonderful to use.

For this card I used MFT’s Ski-son’s Greeting stamp set.  I first stamped the images I wanted to use and Copic color the areas I would not be paper piecing.  I then used some Christmas pattern paper from my stash to stamp and fussy cut the areas I wanted to paper piece.  I ran a black marker around the edges so that it would be seamless.  After which I glued the pieces in my Copic colored image and fussy cut it.  For the background panel, I wanted it to be one layered so stencils were the best choice to add dimensions without the bulk.  I used MFT’s Drifts and Hills stencil and Tumbled Glass Distress Ink to ink blend some snow drifts.  Then I used Honey Bee’s Mountain stencil with Vintage Photo Distress Ink to ink blend the mountain.  What I love about this particular stencil is the reverse side has the shadow of the mountain so I was able to use it as a mask to ink blend my sky with Salty Ocean Distress Oxide.  I then as heard my pieces into this background panel and used an action wobble on the image of the bear who seems to be jumping off a hill. I love the action wobble.  It’s so much fun!  I hope you like what I created.


Saturday, December 2, 2017

Lawn Fawn: Happy Holidays

Hello everyone!
Today I will be featuring Lawn Fawn's Winter Village, Toboggan Together, and Gingham Backdrops stamp sets.  I wanted to do something a bit different than my ink blended scenes.  I love the plaid background I have been seeing on social media and wanted to create a scene card using this pattern.  I remembered I have a Gingham background stamp set from Lawn Fawn and thought it was close to a plaid background.  I cut down some red cardstock to A-2 size and used my MISTI to stamp my background.  It was a bit difficult to line up each time as the stamp was not a full background stamp.  I used the MISTI paper and stamped the striped background onto it and moved my cardstock as close as I could to the stamped image on the MISTI paper.

After I finished the stamping the background.  I stamped the images I wanted to use on white cardstock to Copic Color.  I then fussy cut the images and laid them out on to the background get an idea of where I wanted to put the sentiment.  I used a sentiment from Toboggan Together to heat emboss in white embossing powder right onto the gingham background panel.  I adhered the images to the panel and popped up the characters with foam tape.  I then used Simon Says Stamp White Pigment ink to stamp on some snowflakes from the Toboggan Together stamp set.  To finish the card I used some sequins and star confetti for.  Hope you like my card.


Saturday, November 25, 2017

Mini Cards & Tags: Lawn Fawn, MFT, Mama Elephant, & Clearly Besotted

Hello Everyone!
Today I will be featuring mini cards and tags from various stamp companies.  I Copic colored as well as used Prismacolor pencils.


Tuesday, November 14, 2017

Mama Elephant: Snowy Days

Hello everyone!
Today I will be show casing Mama Elephant's Me and my Yeti, Little Agenda Santa, and Little Agenda Reindeer stamp sets.  I mixed and match these sets together to create an A-2 sized card as well as a mini card.  I used similar color schemes and are complimentary to each other.

I stamped, colored, and fussy cut the images I wanted to use from the stamp sets for the A-2 card.  I used Copic markers to color the images.  I used Lawn Fawns Mountain Die and created snow drifts on the mountain area with MFT's Drifts and Hills stencil.  The mountain area is popped up on to the card base which was ink blended with Distress Oxides in colors Pink Raspberry, Seedless Preserves, and Blue Jeans as well as a touch of Distress Ink in Chipped Sapphire. I used some white paint to splatter onto the ink blended panel to create a star-y look.  I used an Amy R's Snowman Sentiments to heat emboss with Simon Says Stamp Silver embossing powder.  I tucked the Yeti image behind the mountains before I popped up the mountain panel.  I adhered the remaining images onto the mountain area.

For the mini card, it was one layered.  I die cut using Gina Marie Scallop Rectangle die a panel.  I stamped and masked my images.  I used the same color Distress Oxide and Distress Ink as the A-2 panel for the sky and snow drifts.  I used Copic markers to color my images. I hope you like the cards I created.


Friday, November 10, 2017

My Favorite Things: Spoil You Rotten

Hello everyone!
I hope you are doing well.  I'm going to try to update my blog in the next couple of days of the holiday cards/tags that I have created thus far  I am a bit behind (sooooo sorry).  Its been really busy with family activities since the holiday season in full force.  Today, I will be featuring a card I created in November and was spotted by MFT's blog; click here if you would like to see the post on the MFT's website.  I had so much fun creating this card because it was my first time using texture paste.

The card I created was for the most part a one layered card with a bit of dimension from the texture paste.  I first laid out where I wanted my stamped images to be place.  I used MFT's BB Santa's Elves stamp set as well as BB Jingle All the Way.  Only one new mask was cut for the stack of presents next to the main character image because I already had masks made from previous cards.   All the images were masked off.  The Drifts & Hills stencil from MFT was used to ink blend in Tumbled Glass Distress Ink a snow drift scent.  I then used Salt Ocean and Chipped Sapphire Distress Ink  to ink blend the sky.  Once the background was completed I took off the masks (and saved them on the stamps set to use for future cards).  I then colored the images with Copic markers.  I used a sentiment from the Santa's Elves to heat emboss in Rangers fine detail white embossing powder.  I then used Rangers Texture Paste with Simon Says Stamp Falling Snow Stencil to create a snow falling into the scene.  I quickly cleaned the stencil in warm water, as I hear that once the texture paste is solid it would be too difficult to get it off the stencil.  It took about 30 mins for the texture paste to dry.  I hope you like the card I created.


Sunday, November 5, 2017

Christmas is coming! Mini & A-2 Cards featuring Lawn Fawn, My Favorite Things, & Mama Elephant

Hello everyone!
Today I will be featuring quite a few cards most of them are mini cards that are 4.25x2.75in.  Every year I make mini cards for my co-workers at work, usually teachers and staff within my department or work with  closely.  I also make a few for my sister whom gives out gifts for teachers and staff that help with her daughter and son's education.   This year I have about 20-25 mini cards to create and about 10-15 regular A-2 sized cards.  I try to make each one unique, however, with a few more cards this year, I want to see how much I can get done before I start replicating designs.  I have so much fun creating these cards every year.  I usually start creating in October so that I could get them done in time, so from October-December the cards I make are usually Holiday Cards. 

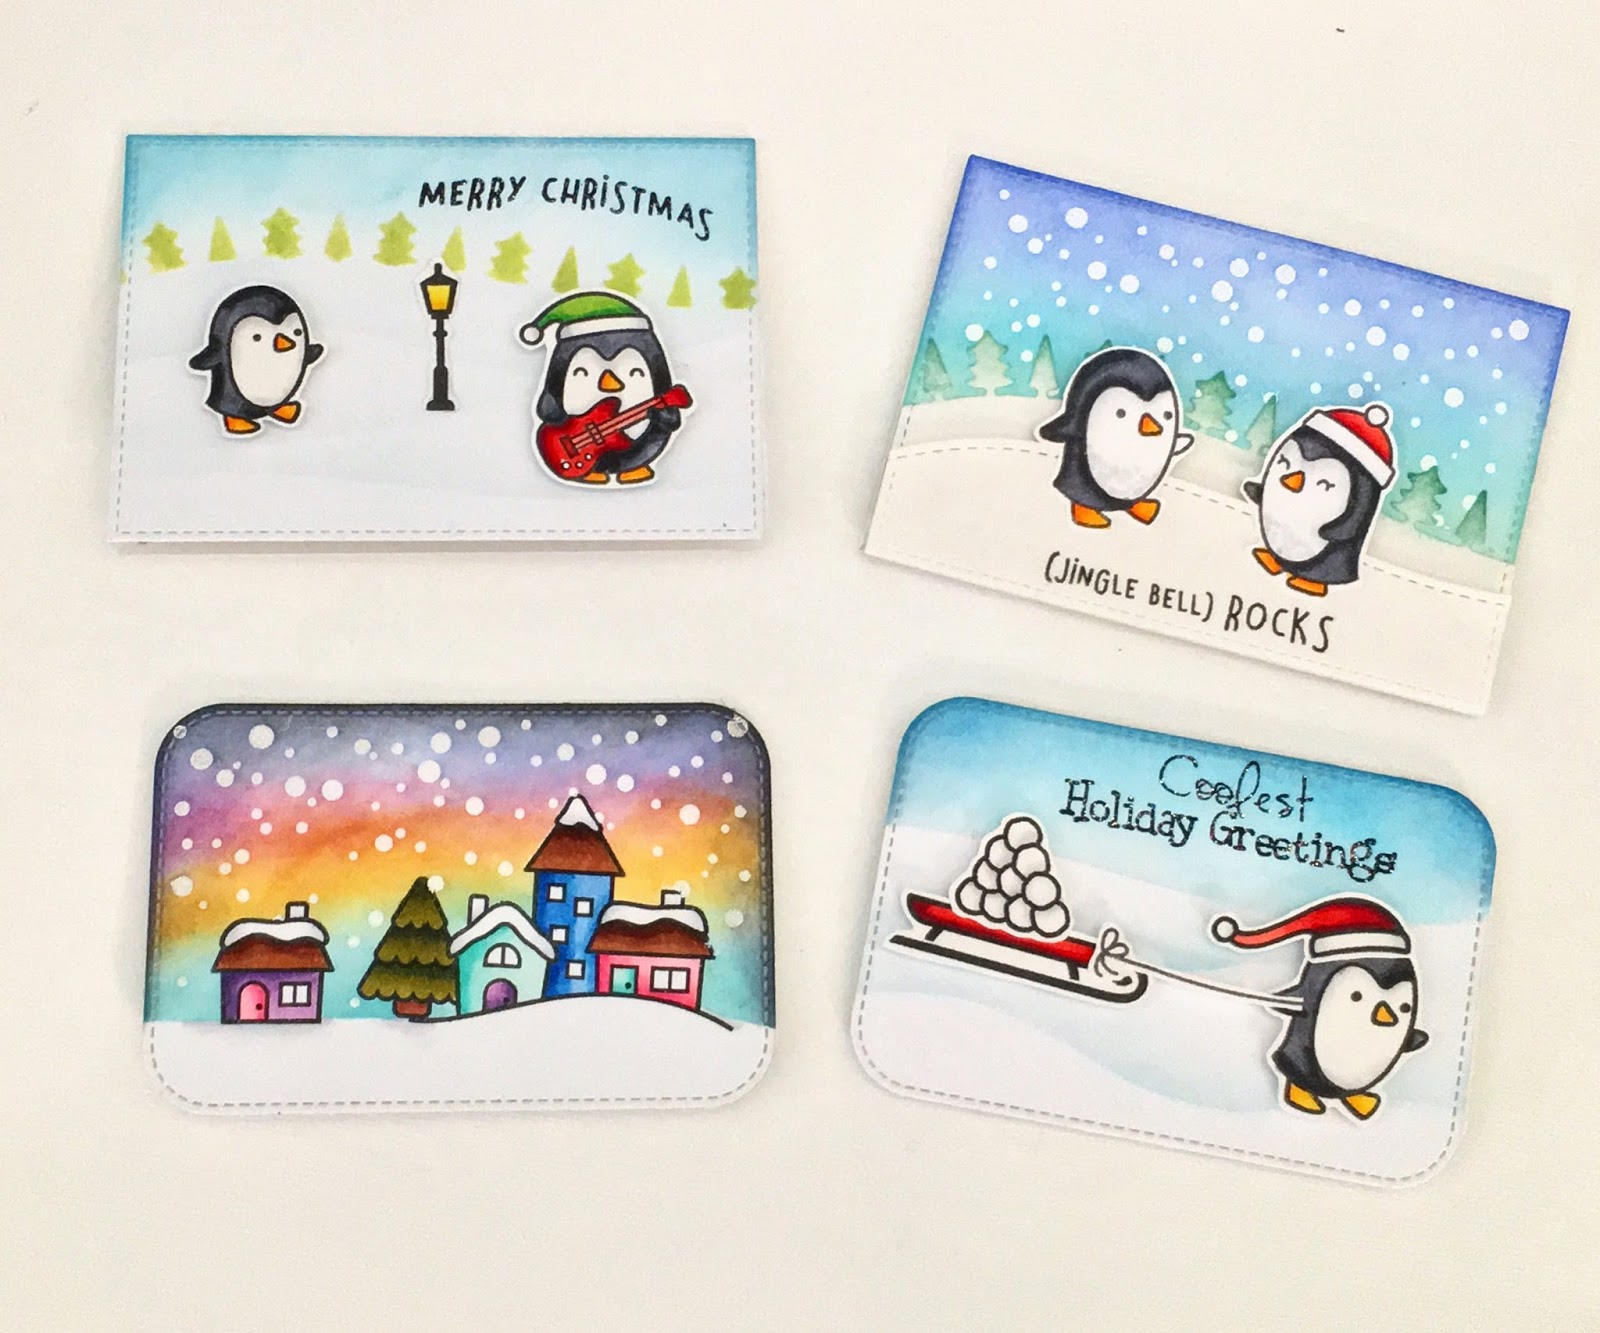
This year I used a combination of a few dies from various companies: Gina Marie Stitch Scallop, MFT's Stitched Rounded Rectangle, Inside/Out Stitched Rectangle, Birch Tree, and Stitched Scallop  Boarder 1 and 2, Lawn Fawn Stitched Hillside Boarder, Mountain Boarder, Tree Boarder and House Boarder dies.  These dies are perfect for winter scenes.  I also used quite a few Stencils to create drifts and snow.  Of course I have to use my distress inks and oxides to add color and dimension to the scene.  A new product to me this year is texture paste and boy am I loving it.  Here are a few cards I have made so far.  Hope you like it.  

I created a full A-2 pop-up version of a mini card I made on the right.  I used my pop up card method that I previously blogged about here.

Here is a close up of the mini card.  I popped up the penguin and lamp.  I used MFT's Drift Stencil to create a bit on dimension. I am loving the Copic combination for Tree's this year (YG 99 & YG 95 with tip to tip method for a smoother transition).

The front of the pop-up card.  I created a band out of 12x12 Christmas Pattern Paper, which is the perfect length.  I cut the pattern paper to 12x1.5in to wrap around the card.  

Inside of the pop up card using various Lawn Fawn Dies.  I used distress oxides in Salty Ocean and splattered with pearl paint and white paint from my Kuretake Gansai Tambi Pallet.

Close up of the pop up.  I wanted to put a song note for the penguins, however did not want it to look out of place in the background.  I used a small piece of transparency to adheare to the Penguin so it looks like its floating.


The mini MFT cards I made.  I tried to keep these a bit simple and used Scallop boarders to create snow drifts as well as a stencil.  I used the Birch Tree die-namics to create a scene and used Pumice Stone Distress ink to create dimension.  I used Oxide colors for the bottom card with Peacock Feathers, Seedless Preserve and Faded Jeans.  I used distress inks in Shaded Lilac and Blue Print Sketch for the polar bear.  I used Tumbled Glass Distress ink for the Hedgehog.


PS: If you would like more up to date look at my cards click on my Instagram link on the side.  I am going to try blog all my cards, but it may take some time because of the quantity of cards I have to make.

Saturday, October 7, 2017

World Cardmaking Day: Heffy Doodle

Hello everyone!
Happy World Cardmaking Day!  I was super excited when I woke up today to create a card.  As I was perusing through Instagram and other social media outlets so many cards sparked my attention.  Then I saw on Heffy Doodle's blog an image that was sooo cute!  I was just in luck because the it was a digital stamp image that the company was giving out just for World Cardmaking day!  I super excited about this and went straight to my craft room to create a card.  A few week ago I saw a beautiful background by Kristina Werner and wanted to make a similar background.  I have not used my Gansai Tambi watercolors in a while and thought this would be a perfect occasion.

First I used my Cricut to Print and Cut the image.  I used my Copic markers to color the image.  Then I used painters tape to tape down my Strathmore watercolor panel to a clip board so the paper would not warp too much.  I knew I would be using a good amount of water to get the color to move.  I used a 3/4 flat watercolor brush to cover the watercolor paper panel.  I then used a 6 round watercolor brush to dab on the colors blue (No.64), purple (No.139), and pink (No.34).  I did one layer of this and let it dry and then made sure the panel was saturated with more clean water and did another layer of color, so that it was vibrant.  I then mixed black (No. 20) and white (No. 10) to create a gray color for the ground.  Once the panel was dry, I picked the metallic white (No. 95) with a brush and flicked it all over the top portion of my panel.  This created such a pretty glimmer.  I also used white (No. 10) to flick some white on the panel for contrast.  I cut down the panel to 4x5.25in.  I used Lawn Fawns Happy for the sentiment which was heat embossed in white.  I then layed down the mailbox and popped the cute Heffy Doodle bear onto the panel.  I used a bit of glossy accents for the heart on the letter and some sparkling clear sequins some I filled with silver stickles.  I then popped the whole panel on a top folding A2 size card.  Hope you like my card!


Sunday, October 1, 2017

Lawn Fawn: Give Thanks

Hello everyone!
Today I will be featuring Lawn Fawns Thankful Mice mini stamp set.  This set is super cute!  I must admit I had a bit of a hard time coming up with a layout for this card.  I've been wanting to use the stamp set since it came in last week, but I did not have a card idea for it.  Most times I purchase a stamp set because I have a few card ideas for them, but this set was so cute that I just had to get it.  Then I remembered I wanted to do a Distress Oxide/Distress Ink comparison so I figured this would be a good start to a card.  I wanted to make similar cards, but not identical cards one using the same colors of Distress Oxides the other using Distress inks (I ended up having to use and extra Distress Ink color, which I explained in the video below).


I started the card by stamping the images I wanted to use with Simon Says Intense black ink and Copic coloring them.  I did two sets of the images so that I could use the images in both cards.  I then used my circle stitched die to die cut two circles from kraft cardstock.  While I had my Big Shot out I decided to die cut Thanks using Gina Marie Designs die.  One of the Panels I layered two pieces of white cardstock below a black cardstock piece.  The other panel I used yellow fun foam and a black cardstock piece to cut the word.   I then used the circle piece as a guideline for how wide I wanted my ink blended area to be for both my cards.  I made one card 4.25x5.5in (Verticle Panel) and the other 5.5x4.25 (Horizontal Panel). I used some low tack tape to tape off the area with scraps on paper so that I would not ink up areas that should not be inked.  I used Spiced Marmalade, Fossilized Amber, and Vintage Photo in both Oxides and Inks.  I added Mustard Seed Distress Ink to the Distress Ink Panel. Once both inked panels were done I used hemp twine to wrap around the inked panels.  I tied a bow on the horizontal card where as the vertical card I looped around the card twice.  I used the "Give" in the "Giving Thanks" sentiment.  I stamped Spiced Marmalade in Distress Oxide for both panel and missed it with water.  By misting the sentiment the Oxidation allowed the sentiment to pop a bit more.  I wanted this to be the shadow for my sentiment.  I offset the sentiment and stamped with black ink.  I went over the sentiment with black gel pen.   I then popped up the stitched circle on top of the hemp twin.  I also popped the images on top of the circle.  I glued the die cut "Thanks" to the card.

I finished the cards by using my Spectrum Nior Shimmer Pen and added some sequins to the cards.  Both cards are similar, but a bit of a change in layout.  I did a Instagram story feed about my thoughts on the Distress formulation; I uploaded this to YouTube which is shown below.  Hope you like my cards.


Sunday, September 24, 2017

MFT Sketch Challenge 351

Hello everyone!
Today I will be featuring MFT's adorable Hippo Birthday stamp set for the sketch challenge.  Here is a mock up of the sketch for this week:

I began by die cutting a stitched rounded rectangle panel as well as the scallop border using the Basic Edges 2.  I then stamped the images I wanted to use on the white cardstock with Simon Says Intense Black Ink as I wanted to Copic color the images.  I wanted my hippos to have clothes so I sketched some with pencil then used my Copic Multi-liner to outline it.  I used Copic Multi-liner because I know the pen will be Copic friendly and not smear when I color it.  Once I colored the images I fussy cut them.  

I then started ink blending the the scallop panel with Twisted Citron Distress Oxide and Mowed Lawn Distress Ink.  I wanted to see how if the different formulas would play well with one another and they seemed to.  The Mowed Lawn was a bit brighter because it did not have that pigment property.  For the main stitch rounded rectangle panel I used Distress Oxide in Peacock Feather and Distress Ink in Tumbled Glass. When I laid down the first layer of Peacock Feather, I thought it was too dark because I was a bit heavy handed with it that was why I switch to Tumbled Glass to lighted it up a bit.  I then used Peacock Feather and the Cloud Border Stencil to create clouds; I made sure to tap off most of the Peacock Feathers on a paper before ink blending with the stencil.   

After I ink blended my panels I heat embossed a sentiment from the stamp set with Rangers White embossing powder on black cardstock.  I then used the smallest stitch rounded rectangle to die cut the sentiment.  I popped the scallop panel up onto the stitched rectangle panel.  I also popped the sentiment.  When I finished putting my images on the card, initially I only had the little hippo, cake w/balloons, and big hippo, it looked a bit empty, so I decided to stamp all the tiny birds from the set to Copic color.  I also added patches of grass to the scallop panel.  I then used my Specrtrum Nior Glitter pen to put some glitter on to the balloon, cake, party hats the hippos are wearing and the red strips on the papa hippo.  After, I used a white gel pen to decorate the cake, and put highlights on the balloons.  I like to use the glitter pen before using my white gel pen because I noticed that if I put the Glitter on after I put white accents it tends to muttle the white gel pen.   I hope you like the card I created.  


Friday, September 22, 2017

Fall 2017 CLH feat. Lawn Fawn

Hello everyone!
I made a simple card today featuring Lawn Fawns Pumkin Spice mini stamp set.  I started by cutting some kraft cardstock to A2 size then I randomly stamped the coffee cup throughout my card and used  the shaker and sugar specs to fill in the gaps.  I used my Prismacolor colored Pencils to color in the image.  I love the way Prismas look on kraft; they colors seem to pop more in it.  I started by laying my lightest color lightly then shaded with my mid tone in areas I wanted to darken.  I used the darkest color last to add some depth and then went back in with the midtown and the lightest color to smooth everything out.  Once the panel was done I used MFT border dies to all stitching all around the panel.  I embossed the sentiment on a strip of vellum with clear ink and heat set it using Ranger white embossing powder.  I wrapped the sentiment strip around the card and taped it down so no adhesive could show through.  The panel was then adhered down onto heavy weight white cardstock.  Hope you like my card.


Saturday, September 16, 2017

My Favorite Things: A Halloween Hello

Hello everyone!
I hope the week has treated you well and that the beginning of the weekend brings you joy! I know the weekend brings me much joy.  Today I will be featuring MFT's Witch Way is the Candy? stamp set.  The set I have is the older stamp set that has been retired.  They recently re-release an updated version of the stamp set with more sentiments.  So, I am late on the Distress Oxide train.... I own all the Distress Inks in the mini form, thus did not think I would need to get them in the oxide version.  Boy was I wrong.  As I kept seeing them in use on cards on social media, it made me want to try them out.  I found an etsy shop that was selling both the first set and second set of inks.  The reason why I chose this shop is because all the proceeds from her sales go towards charities; isn't that awesome!  Here is a link to her store: Only One Life Creations.  I had a lot of fun playing with the Oxides and can't wait to experiment more with them.

I first started by using my Cricut to cut out the components to a haunted house SVG that I bought from Miss Kate Cuttables on heavy weight white cardstock. I cut them in white because I knew I wanted to use my Distress Oxide to ink blend them in with color.  I used Wilted Violet, Twisted Citron, and Black Soot in the Oxide as well as Ripe Persimmon and  Wild Honey in Distress Ink.    The reason why I did those two colors in the ink form is because I wanted it to be a bit more vibrant for the light effect in the windows.  I glued all the pieces together and spritzed it with some water to create the oxide effect.  I then die cut the curved scallop with MFT's Scallop Basic Edge 2 die and used Lawn Fawn Meadow Border for a grass panel on white cardstock as well.  I used Distress Oxide in Vintage Photo and Frayed Burlap for the Scallop piece and Peeled Paint and Cracked Pistachio for the grass piece. I spritzs some water onto the brown panel to distress it a bit.  For the night sky, I used masking paper to cut die cut a circle (the moon) and place it on my panel so I could Distress the rest of the sky.  I used Faded Jeans and Black Soot Oxide inks.  Once I distressed the sky I misted it with water and let it dry.  I then water down some white acrylic paint to splatter onto the background.  I also water down some Pearl acrylic paint to splatter; loved how this looked on the background. It made the splatter look like twinkling stars.  Once I finished splattering I took the mask off and went over the edges of the moon with a water pen so the edges did not look too harsh.  I put down my brown dirt panel then my grass. I put the haunted house on top of the scallop panel and popped up my girl image.  I double popped my sentiment which I white heat embossed on black cardstock.  I glued some of the bat images down and popped up two.  I finished the card by adding Spectrum Noir's Sparkling Clear Glitter on the dress and bats.  Hope you like my card.


Monday, September 4, 2017

MFT Sketch Challenge 348

Hello everyone!
Today, I will be featuring My Favorite Things Fall Friends stamp set for the MFT sketch challenge. Here is the layout for this sketch challenge.

I was in a kraft cardstock/Prismacolor Pencil mood, so that is what I went with.  As much as I love the outcome of coloring with colored pencils, I dislike having to re-outline my images with black because I am really bad at it.  I can not for the life of me trace; it usually ends up in mistakes.  However, I decided to use my MISTI to stamp my images on the kraft cardstock.  I outline the area I would be die cutting so that I knew my images would fit.  Then I used the three sides of the MISTI to place my stamps as I would be overlapping some images which is why I created some masks.  I left the stamps in my MISTI so that I could re-stamp them after I finished coloring them.
          

I also used the radiating rays stencil to distress some Wild Honey, Mustard Seed, and Squeezed Lemon Aid. I then die cut the image using the rounded rectangle die and back it with black cardstock so there would be a border.  I used my We R Crop-a-Dile to round the edges of the black cardstock.  for the bottom panel I used MFT's Fine Chevron Background stamp to create a pattern paper, which i cut down to fit the lower 1/4 of the card.  I then used a sentiment from the Fall Friends stamp set to heat emboss in white embossing powder on black cardstock and created fish tails on both ends.  I popped my main image panel up with foam tape and double up the foam tape for my sentiment.  To finish the card I used some orange and iridescent yellow sequins.  Hope you like my card. :)

Sunday, September 3, 2017

My Favorite Things & Honey Bee Stamps: Oceans of Love

Hello everyone!
Today I'm here to share a card using MFT's Mermazing Stamp set as well as Honey Bee Stamp's Ocean Builder Scene stencils.  I am in love with Honey Bee's stencil.  I love all the components to build a under the sea scene, which you can pick and choose from.  When I saw Nichol Magouirk using them in one of her videos I had to get it.  I created a similar under the sea theme for the bottom space of my card.

I first started by using Distress Ink in the colors Faded Jeans, Mermaid Lagoon, and Black Soot to create the ocean scene.  I masked the top 25% of the card with some paper so that I could create a moonlight night scene using Faded Jeans and Black Soot.  I die cut a circle from masking paper to create the moon; I kept the  negative to mask off the sky to distress the moon in Pumice Stone.  I used Mustard Seed and a scatter star stencil to create some starts.  I used Mermaid Lagoon with Honey Bee's Stencil to create some rays.  I tried using Simon Says white pigment ink to create some white shadow rays, but it wasn't working too well on the regular distress ink even when pouncing method.  I assume it does not layer too well with the dark colors.   Nichol Magouik used Distress Oxides in her video, but I do not have those yet (making me think hard about getting them).  I did my best to create some moon light shadow rays.  I used Black Soot to crate some coral with the stencils as well as some second generation stamping of fish from the stamp set.  I then used Simon Says Stamp Intense Black to stamp the images I wanted to use from the stamp set and Copic colored it.  The scene I create was inspired by Disney's, "The Little Mermaid" (picture below). I then stamped a sentiment from the stamp set with clear embossing ink on black cardstock and heat it with white embossing powder.  I hope you like the card I created.  :)

Saturday, August 26, 2017

My Favorite Things: Little Mermaid

Hello Everyone!
I am here with a card I created last week. I just realize I did not do a blog post for a card I made and posted on Instagram.  The card was inspired by the Disney movie, "The Little Mermaid".  I created a scene from the movie where Arial is on a rock looking out to Eric and his dog Max.  I used a few MFT stamp sets including, Our Story, Mermazing, and Lucky Dog.  I started by stamping my images onto white cardstock. I wanted the Mermaid to be in the opposite direction of what it stamped out so I mirror stamped the image by using my MISTI and a solid stamp.  The image was not as black as I wanted to be, but I would be outlining it again after I copic colored the image.  Once the images were colored I used the Beach Scene Dienamics to cut out an ocean piece in white cardstock.  I used distress ink in Mermaid Lagoon to ink blend the ocean piece.  I then used Scattered Straw for the sand and Vintage Photo for the cliff rocks.  I also used my Copic markers to draw in lines to emulate the rocks.  I then used a sentiment from Our Story to heat emboss on black cardstock with white embossing powder.  I popped the ocean panel up onto the card as well as the sentiment. I thought there was something missing from the sand, so I used my Copic maker to dot some areas of the sand to make it more textured.  I hope you like my finished card.  :)


Saturday, August 12, 2017

Mama Elephant & My Favorite Things: Bright and Sun Shining Day

Hello everyone!
Happy weekend.  :)  Today I will be featuring two stamp sets by two different stamp companies: Mama Elephant's Carried Away and My Favorite Thing's Up in the Air.  This card is another one layered wonder scene card.  I started out by laying/stamping out my idea on a scrap piece of printer paper so I could get an idea of what images I should stamp first.  As I do not have my boarder dies, I freehand sketch a hill boarder on my scrap paper so that I could it cut out later as a masking piece.

Once I was satisfied with where I wanted everything to be placed, I stamped my images on an A2 panel piece.  I created masks for images I did not have masks for.  My Up in the Air stamp set had plenty of masks to work with so I did not have to make many masks.  Once all my images were stamped out and masked I was ready to create the hill and sky.  I used the scrap sketch and cut the hill off to use as a mask for the hill section and sky section.  I used Distress Inks in the colors Mowed Lawn and Twisted Citron for my hill masking off the sky section.  Once my hill was complete I used the other side of the paper to mask off the hill so that I could work on the sky.  I used Distress Ink color Salty Ocean to create a light blend at the bottom of the sky then I used my cloud stencils to create a cloudy sky with Tumbled Glass Distress Ink.  Once I was done with the clouds I used the Radiating Rays stencil to create a bright sun using Squeezed Lemon-aid and Mustard Seed Distress Inks.  I then unmasked all my images to Copic color them in.  The stark contrast between the distressed background and uncolored images always gets me.  I usually hesitate at this point on weather the card is looking okay to continue, but I almost always try to persevere and finish the card.  The final touches to the card once I Copic colored the images is to put some Sparkling Clear Spectrum Noir Glitter Pen on the son, hot air balloon, and trees. 


Saturday, August 5, 2017

MFT Sketch Challenge 344

Hello everyone!
I'm still away from my craft room but still wanting to create!   I can't believe I forgot my black cardstock :(.  I usually bring at least one piece of black cardstock for my sentiments.  Luckily I had a scrap of red cardstock in my folder.  I didn't bring many inks to make my own colored cardstock either but you work with you got, right?   I've been wanting to practice my watercoloring so I decided to dust off my Zig Clean Color Real Brush Markers for this card.   First, I went to MFT's blog to see what the Sketch is for the week.  Here is the mock up:

I will be featuring MFT's BB Happy Hedgehogs for today's card.  I had an idea of what I wanted to do heading into the project.  I stamped all the small hedghog images on Strathmore watercolor paper flipping and turning the images.  I wanted to create a pattern paper like panel utilizing the images.  After the hedgehogs were stamped I used the smaller leaf and nut images to fill in the gaps.  I then watercolored the panel with my ziggies.   I wanted there to be a variation in skin tone so the panel didn't look too boring.  :P It was looking really brown until I colored the leaves and background in.  I water down a light blue color for the background.  Once the panel was completed I used a bowl (yup a bowl) to trace a curve at the bottom of the panel sit that I could cut it out.  I then used some red cardstock to cover the bottom portion of my card base and to heat emboss a sentiment.  I used some velum to layer under the sentiment piece because I did not want to cover my pattern paper panel up too much.  I popped the panel up on the card base and then popped my sentiment piece up on the panel.  I hope you like my card :)


Tuesday, August 1, 2017

MFT Sketch Challenge 343

Hello everyone,
Today I will be featuring BB Space Explorer for MFT's sketch this week.  I am currently away from my craft room visiting my boyfriend in Northern California.  I brought some of my craft supplies, but very limited amount.  Don't you wish you could magically take all your craft supplies with you everywhere you go.  :P  While my boyfriend is at work I have some time to make a card! :)  I also wanted to create a card suing MFT's Sketch Challenge this week.  Here is a mock up of the sketch:

Since I do not have all my supplies, I took some creative liberties with the sketch today.  I brought some of my stencils and distress inks; thank goodness I did because I would have not been able to create much of anything since I do not have my die cutting machine here.  I started with cutting a 2.5x 5.5in  panel, which I will use as a substitute for the oval frame.  I used the cloud boarder stencil to create a multi-colored cloud background using distress inks in the colors Tumbled Glass, Picked Raspberry, Wilted Violet, and Spice Marmalade.  I then stamped the image I wanted to use from the Space Explorer stamp set with Simon Says Stamp Intense Black ink so that I could Copic color the image.  I then stamped a sentiment from BB's Up in the Air stamp set on  a strip of white cardstock using black ink.  I used a strip of red cardstock to underlay it with the white cardstock sentiment.  I then heat embossed another sentiment from the Space Explorer stamp set with white embossing powder on red cardstock and cut fishtails on the ends.  I laid the cloud panel and white cardstock sentiment together onto the card base.  I popped my main image as well as the red cardstock sentiment.  For the final touches I added some sequins around the panel.  I hope you like my card.  :)


Saturday, July 22, 2017

MFT Sketch Challenge 342

Hello everyone!
Today I am here with a card for this week's MFT Sketch Challenge.  I missed out on entering the last card into the challenge by a couple of hours, so I thought I'd try to make it this week.  :P  The sketch for the week is:

When I saw this sketch and rummaged through my MFT stamps I saw three stamp sets I could combine to create a double scene.  I had so much fun working on this card.  All the stamp sets I used were from the Birdie Brown line (love!).  The sets I used were Magical Unicorn, Magical Dragon, and Our Story.  I thought  the top section as setting a scene where we catch a glimpse into the little girl's mind envisioning herself as the character in the book she is reading, which of course is loving the pretty unicorn and her as a princess.  The bottom part is of course her reading and engulfed in this books dreaming it could come true.  

I started by using MFT's Stitch Scallop Basic Edge to die cut the top panel from heavy weight white and mint green cardstock.  I then used MFT's Grassy Hill to die cut the mint green cardstock to create a grassy boarder.  I used my MIST to ink up the images I wanted to use and stamped in on to heavy weight white cardstock with Simon Says Intense Black ink.  I used my MISTI because I knew I would need to stamp it a few times to get dark lines.  I also stamped the image of the little girl reading a book on some pattern paper as I wanted to paper piece the chair.  I Copic colored my images and fussy cut them as well as the chair that I stamped on pattern paper.  I then lined the pattern paper chair with black marker so the white spaces would not show.  I moved on to the distressing I would be doing for my panels.  I used Mowed Lawn distress ink to give a deeper color to the grassy hill boarder and also give some contrast.  I used the puffly cloud stencil to create a light cloudy scene at the top of my white Scallop Basic Stitched panel.  I then taped off the bottom of my main panel piece and used Hickory Smoke distress ink to create a ground for the little girl sitting on the chair. I used Hero Arts Stylish Boarder stencil with Abandon Coral Distress ink to create a wall paper look.  I then stamped a sentiment from the Magical Unicorn stamp set on black cardstock and used Simon Says Stamp Silver embossing powder.  I popped the Scallop Basic Stitched panel up on the card to create almost like a thought bubble as well as the sentiment. I finished off the card by using Spectrum Niors Shimmer pen on the Unicorn's main, horn, and the Princess's crown.  I used glossy accents for the horn and crown.  I hope you like what I created. :)


Click Image to be taken to the page I was featured in! :)


Tuesday, July 18, 2017

MFT Sketch Challenge 341

Hello everyone!
Today I will be featuring MFT's Magical Unicorns.  I've hit a creative wall this past week and thought maybe a sketch would help inspire me to get my creativity going and I love MFT's sketch challenges, so I decided to pull inspiration from it.  The sketch for the week is:
When I saw the middle square, I thought of making a shaker card from it.  I used a colorful heart pattern paper from my stash and MFT's Scallop Basic Border 2 die to cut the edges.  I used heavy weight cardstock and my inside/outside stitched square dies to create a frame.  I then stamped the images I wanted to use from the stamp set onto heavy weight cardstock with Simon Says Intense Black in so that I could Copic color the image.  I then fussy cut my images. I used acetate to cover my square frame and popped it up with double foam tape so the sequins would share a bit more freely.  I used rainbow colors of sequins in 4mm, 5mm, and 10mm sizes.  I then heat embossed a sentiment from the stamp set on black cardstock with white embossing powder and cut fishtails at each end.   I placed the sentiment at the bottom of my square panel and glued on my copic colored images.  To finish the images off I used Spectrum Noir's Clear Sparkling Pen on my unicorn and rainbow.  I also put glossy accent on the horn of the Unicorn.  I hope you like my card.  :)
Edit: :( Sad times... I was 2 hours too late in entering the card for the Sketch challenge.  Oh well,I had fun creating the card :).

Wednesday, July 12, 2017

Crafting Desert Divas: Fairy Happiness

Hello everyone!
Today I am sharing a card featuring Crafting Desert Divas digi stamps once again.  I have been having some fun playing with the digi stamps; I usually use polymer stamps, so it was fun to be able to customize the size of the image to fit my layout.  I used my Cricut to print and cut the images.  I have been having some issues with the print and cut settings since the company upgraded their Design Space system from flash to html5.  The cuts are slightly off, but they were not too noticeable.  I do love how much faster the system is though.  Once I printed and cut my images I used my Prismacolor Pencils to color them in.  I had a layout in mind for the images and sized them to fit the card.  I used a grass boarder die to create two grass panels and distress them with Mowed Lawn, Twisted Citron, Bundled Sage, and Forest Moss.  I then used the clouded boarder stencil to distress some tumbled glass to create a clouded sky.  I then put the grass boarder popping up the front grass panel.  I then glued the images on and popped up the image of the fairy sitting on the flower up.  I stamped a sentiment using  Amy R's stamps with Simon Says Stamp Black.  The last touches was to put some clear sequins around the sentiment.  :)  Hope you like my card!


Thursday, July 6, 2017

My Favorite Things: Ewe Have My Heart

Hello everyone!
Today I will be featuring MFT's Ewe Are the Best stamp set.  I made this card last week, but it was going to someone special and I didn't want to post it till he received it.  :)  I had an idea of what I wanted to create with this card; some details were changed but I liked the outcome.  At first I was wanted there to be a circle image piece to the bottom left, but as I was conceptualizing it and looking about my supplies I remembered I had a heart die that would be perfect.  I cut a piece of scrap printer paper with the 3rd largest heart die by Gina Marie to create a mask.  Instead of using the heart I used the opening to distress onto my card base.  I used Tumbled Glass to create a light heart outline, then used my cloud stencils to distress some clouds.  Once I finished distressing my cloud I used my Radiating Rays stencil to create some sun rays at the top of the heart.  After, I stamped the images I wanted to use with Simon Says Intense Black ink, so that I could Copic color my images.   Once I finished coloring the images I fussy cut them out. For my main sheep image I wanted it to have more texture and I remember I had this paint pen that puffed up when heated, so I used this on for the sheep's coat.  I actually forgot how to use the pen and had to google directions, which somewhat guided me, however, I remember how to use the product once I started working it.  I remember there needed to be a good amount of liquid, so on a separate piece of paper I let some of the liquid drain out so that I could pick it up with the tip of the marker to put on my image.  So, the direction says to wait for the liquid to dry before you heat it, but really its best to heat it when its still wet; it puffs up more.  Also, work in layers.  Once you finish on layer of puff and you still want more puff, put on top of the first layer of puff and heat to create a fuller look.  I loved how it turned out, it look so much like fur.  I then used a scrap piece of white cardstock to die cut the bottom of the heart to use for a grass piece.  I used Lawn Fawn's meadow grass boarder to die cut grass from the bottom heart piece.  I distress the grass piess with Forest Moss, Mowed Lawn, and Twisted Citron.  I was able to line up this piece with the heart on my base because I had distress the heart earlier.  I glued my images down, popping the sheep up with foam. I used a sentiment from the stamp set and stamped it using my MISTI with Versafine Onyx black.  I finished the card by putting some clear sequins as embellishments.   I hope you like the card I created.


Crafting Desert Divas: Interactive River Tubing

Hi everyone!
Today I will be featuring Crafting Desert Divas digital stamp "Cool Summer" (click to see the stamp at CDD's website).  CDD has been releasing a few new digital stamps for free by attending their Facebook Group release event here.  When I saw this image I thought of either pool or river, but then I remembered how my friends would go river tubing down the Sacramento River; I did not participate in this because I do not know how to swim :(.  When I first started this card, it was not going to be interactive. I usually do not make interactive cards because something usually goes wrong and I get really frustrated when the card gets ruined by lack of thinking or knowing how to make the interactive element work.  However, as I was putting the card together, I thought this would be cool if the Rhino could move down the river.  So, I put my feelings aside about interactive cards to try and create a card with the Rhino moving down the river.  There were a lot of ups and downs with this card as I actually had to tear apart one of my card bases because the slider motion was not working (I needed to double up my foam tape) and I did not expect the card to be so bulky (I had more foam tape for the front water), but luckily it all came together.

I first started with downloading the image onto my computer so that I could use Photoshop to add a white boarder around my image.  After I uploaded the image into my Cricut to print and cut.  I love that I am able to do this with the image because I usually fussy cut my images and that is not so fun.  Once I had my image I used my Copics to color the image.  At this point I was crossing my fingers that the printer ink would not smudge from the markers. Woo! It didn't.  Then I went on creating waves with both white cardstock and vellum and distressing the white cardstock with Salty Ocean and Mermaid Lagoon.  While I was distressing I took a 5.5 x 4.25 cardstock panel to distress the sky and sun that I wanted.  I then glued down my first 2 waves onto the panel and used a slider die to cut through the layers of cardstock.  Here is where things started go array.  I was using 110LB cardstock for both my waves and panel so the slider channel die would not cut through all the layers.  I tried putting some foam under to create more pressure but that did not work, then I realized I should just take the cut paper out and re-align the die to cut the last layer (duh!).  After I glued down the track piece to my card base and used 3M foam tape to pop the panel up so the slider mechanism would work.  Well, when I finally was able to put the front panel in, and put the Rhino on the track it wouldn't slide! I was almost over making this card as I had to tear the panel off of my card base and it was not a pretty sight, but I persevered (mostly because I already put so much time into making the card).   I put another layer of foam tape, luckly I was able to save the track piece to glue down onto another card base. Once the panel was down I put the Rhino back on the track and it worked! :) Well, I didn't really think about the 2 remaining waves and how I would have to double pop them up so that the Rhino could move down the track.  :( This ended up making my card pretty bulky and probably won't be able to send this in the main.  It will be a card I'd have to give someone by hand, but it works! :P  I was quite proud of making the interactive card.  I'm not sure when I will make another one though.  Sorry for the long post.  I thought I'd share my woes on making this card.  Hope you like it.


Tuesday, July 4, 2017

My Favorite Things: Blooms Background

Hello everyone!
Today I will be featuring MFT's Springtime Blooms stamp set.  The inspiration came from MFT's instagram post a couple days ago with a similar stamp set that used white embossing on black cardstock.  I love the simplicity of the card, but I want to take a bit further.  I loved the black with white heat embossing and wanted to see if I would be able to add color onto the black cardstock and it actually show the colors.  I had to think of anything very bright and opaque mediums in my stash.  I thought of my prismacolors as it works well on craft cardstock so I tested a few colors on a piece of black cardstock; the key is to pick bright and light enough colors to show on the black cardstock.  I then remembered my Kuretake Gansai Tambi pallet had some pearlescent colors in it that I could use.  I do not use my Gansai Tambi watercolors often because I am really terrible at watercoloring, still working on this.  I started by stamping my images onto the black cardstock with Simon Says Stamp embossing ink, which is similar to Versafine embossing ink.  I think Simon Says Stamp's embossing ink is a bit more sticky than Versafine. I used most of the images in the stamp set; first using the larger images to stamp then smaller images to fill in the spots.  I used Rangers fine white embossing powder to coat each of my panel (I made 2 one for each color medium) and heated the powder till it melted.  I started with my Prismacolor pencils.  With Prismacolored pencils the key is to use light layers to build the color, if you put to much pressure when coloring eventually it will create a waxy thickness that will not allow you to build anymore color.  Also, having a sharp pencil tip helps when coloring.  I currently do not have a blending medium for the pencils, but I found that if you lightly layer enough the colors will blend itself.  Maybe in the feature I will get a blending a medium, but for now I'm liking the bit of texture.  For the other panel, I used the pearlescent colors from Gansai Tambi.  I had to be careful about the amount of water I used for the panel because the paper I used was just black cardstock and not watercolor paper.  Its a good thing that the Gamsai Tambi pallet is super thick and opaque.  As I was watercoloring my flowers I realized that there is a white pearlescent color and thought, "I wonder if the pearlescent will show if I mix in other colors".  It did work!  I was super happy I was able to create different pearlescent colors for my panel.  When mixing the white pearlescent and the other colors make sure that you do not add too much color to pearlescent as it will become more opaque than pearlescent.  You have to play around with the mixture to get a good medium.  Also, because the pearlescent is white it will lighten the color you are using, so mix in a darker shade than you need.  I had fun mixing and creating colors I needed.  :)   After I was done with the panel I used 2 of the sentiments in the stamp set and stamped/embossed with Versafine Onyx black and clear embossing powder on a white cardstock to make it pop on the card.  I also popped the sentiment up on the panel.  I used MFT's stitched boarder dies to add a bit to the sentiment.  I cut done both panel 1/4 inch top and bottom so that when I put it on my white card base there was a bit of boarder.  Hope you like my card.


Update 7/12:
Ahhh! These cards were featured in MFT's You've Been Spotted this week! So crazy and am so honored to be on their blog.  Click picture to see the blog post on MFT's blog.


Friday, June 30, 2017

Summer 2017 Coffee Lovers Blog Hop!

Hello everyone!
Ahhh.... I almost missed out on making a card for the Summer Coffee Lovers Blog Hop.  I don't know how I dazed on this event because I have been following it for a while; also because I love coffee!  I think I have been super busy with my nieces and nephews that I lost sight of it, but I did manage to put up a card today for it.  A simple one layered wonder.  I quickly went through my stash of stamps and had a few cards in mind.  I finally was able to purchase a few coffee related stamps, although there are a few more on my wish list. :P  When I rolled around to MFT's Beast Friend with the mug I immediately was drawn to it.  I figured I could do a small scene with the image with an Amy R. sentiment stamp.  I love Amy R's sentiment stamps, too bad she no longer makes/sells them. :( I have been looking out for them in destash groups.  I stamped the main image in Simon Says Intense Black ink and luckily I had a mask made for it from a previous card; I save all my masks for the stamp sets for such occasions, so I don't have to make masks for them over again.  Once I masked the image I stamped a few trees.  I decided to use my Prismacolor pencils today to color them in.  It has been a lot of fun playing and coloring with them.  Once I finished coloring the images I used my stamped my sentiment with Simon Says Black ink, which is a great black ink for sentiments.  Hope you like my card.


Wednesday, June 28, 2017

My Favorite Things: Tweet Wishes

Hello everyone!
I totally forgot to do a blog post for the card I posted on my Instagram yesterday, so here it is.  :)  I will be featuring MFT's Tweet Wishes.  I recently received a wonderful gift from my boyfriend that I am beyond grateful for.  I have been wanting to try my hand at color pencils because of all the beautiful cards crafty guru's like Nicole Spohr and Sandy Allnock have been making with them.  I received a large package of Prismacolor Pencils in the mail last week and wanted to create a card using them.  From what I gather the color payoff is most present on craft card stock; luckily I had one piece of 4.25 x 5.5 in my stash, which means I will be adding craft card stock to my list of supplies I need to purchase.  This card was definitely not planned out, I was working at what I wanted to do as I was making the card.  I used my MISTI to stamp two images from the Tweet Wishes stamp set; I also made a mask for the owl because I wanted the tree behind it.  I used various colors of blue, yellow, green, and browns to color the images.  I had no idea where to start with the colors because I have not made swatches for all the colors I have (I still need to do this).   I looked up on google which shades would blend well with each other.  Once I was done I used MFT's Scallops Basic Edge dies to cut the edge of the craft cardstock as well as another edge from white cardstock. .  I used a pattern paper from my stash that seemed to go with the geometric shape of the owl I used.  I popped up my image panel with fun foam.  I used one of the sentiment from the set and stamped it with Versafine Onyx Black.  I hope you like my simple card.  :)