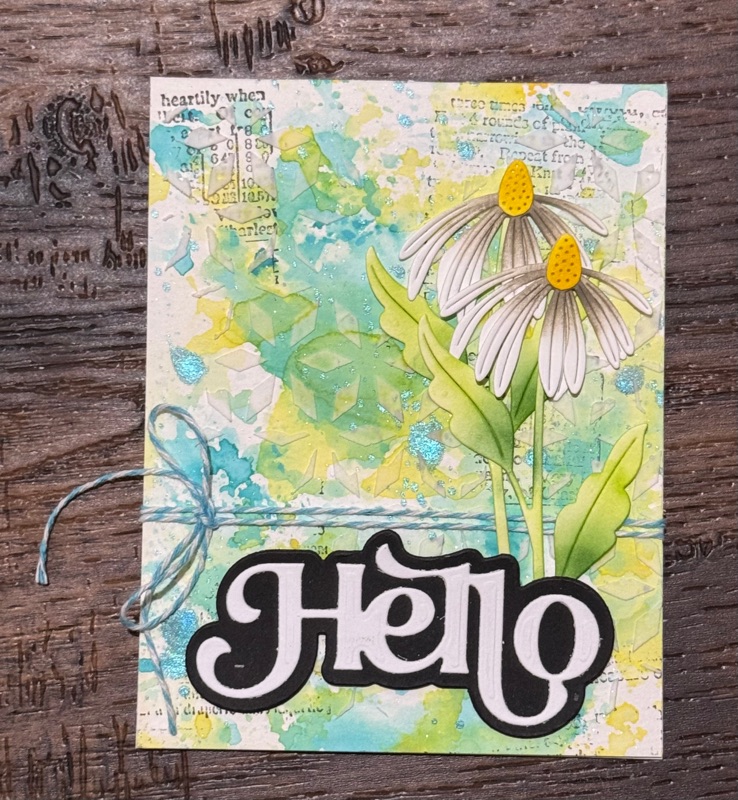
Wednesday, June 23, 2021

MFT Slimeline Challenge: Things with Wings

 Hello Hello!

Summer break is here, so to kick things off to find some inspiration, I thought I would do a challenge.  I love MFT's Challenges so I strolled on over to their blog to see what challenge they have up and found their SlimLine challenge.  In the past year and half I've seen a big boom of slimline cards, I only began making them this past Christmas as my usual go to are A2 cards.  MFT SlimLine Challenge this month was things with wings, so birds, airplanes, insects, etc.  I was looking through my MFT stamp sets and remember my owls from the Tweet Wishes.  I combined this with Tweet on You (branch/tree).  I used Neenah Dessert Storm 80LB card stock to stamp my images with MFT's Extreme Black ink.  I colored the images using Prismacolor pencils.  


Monday, June 4, 2018

1,000 Followers on Instagram GIVEAWAY!!

Hello Everyone!

Truly, I am very thankful for all the support and comments I have received on Instagram.  When I started my Instagram page for my cards, I never imagined reaching 1,000 followers.  All I wanted to do was document the cards I made and follow fellow card makers so that I could learn (in awe) of everyone's abilities.  This crafting community has been such a positive and encouraging influence to my experience as a card maker.  I continue to push my comfort zone and gain new perspectives because of all the work I see everyone share. THANK YOU, from the bottom of my heart! :)

As a gratitude for your continued support, I am doing a GIVEAWAY! :)  You will have from now until June 11 at Midnight to submit your entry through the Raffle-copter below for a $20 gift card to a crafty shop of your choice.  Please use an email address that you check often as I will be emailing the winner to ask what shop they would like the gift card to be.  The winner will have 24 hours to reply; if they do not I will choose another winner.  

a Rafflecopter giveaway

Sunday, April 22, 2018

My Favorite Things: Bubble Kisses

Hello everyone!
Today I will be featuring MFT's Bubble over with Joy stamp set.  I was in the mood to play and experiment and remembered a technique that Jennifer McGuire featured in one her videos with Distress Oxides and Alcohol Ink Paper.  I just recently invested in some Alcohol inks (still need to get some YUPO) and do not necessarily like how they react on the alcohol ink paper, so I decided to try this idea from Jennifer McGuire with Distress Oxides and Micro Glaze.  I thought the effect was so cool, especially because you can each layer you put on top of each other.  At first I wanted to paint on the oxides and actually preped for this by taping my cardstock to a clip board, but when I started to add color to the paper I did not like the effect too much, so I decided on the smooshing method.  I have a glass desk so it make it a bit easier to smoosh the inks on my desk to spray water on.  I used the colors Candied Apple, Spiced Marmalade and Picked Raspberry.  I smooshed the cardstock onto the water down colors and heat dried it; I repeated this process and added more ink on my glass to deepen some areas.  I also create splatters for each color because I wanted some distinct dots of color.  After I was satisfied with the coverage I stopped smooching.  At this point my cardstock panel was a hot mess and was doubting the project, but I persevered; it didn't help that my hands were getting super chalky from the ink on the paper.  I then used a blending tool with a new foam top to Micro Glaze it.  I had never used Micro Glaze prior to this, it is a jelly like substance, a bit oily in texture almost like Vaseline.  I put dip a little bit and began to rub/blend it onto my Oxide panel piece.  I realized I need a bit more for coverage (I wasn't sure how much to use, but a good swirl in the jar was what it needed.  Once I put the Glaze on it was like magic, all the Oxide colors popped and I could see the layers I smooshed onto the panel.  I was sooo happy it with how it turned out.

Once I was done the panel, I used MFT's Stitched Rectangle Stax (largest size) to die cut the panel.  It was a big warped from the water at this point, but running it through my Big Shot help flatten it a bit.  I then stamped out the images I wanted to use with MFT's Extreme Black Ink on heavy weight cardstock so that I could Copic Color the image. I then fussy cut the images.  I used a sentiment from the stamp set.  I heat embossed it in white embossing power on red cardstock and popped it up on my Oxide panel.  I adhered my images popping up tthe bunny blowing the bubble.  I also used fun foam to back my Oxide panel so it was more stable and adhered it onto my card base.  For some finishing touches I added some Jewels.  I hope you like my card.


Copic Colors
Bunny Complexion
E 53, 51, 50
R20
Dress
BV 04, 02 00
B 04, 02, 00
Bubbles
BG 01, 000, 0000

Oxide Colors
Candy Apple
Spiced Marmalade
Picked Rasberry

Saturday, April 7, 2018

Mama Elephant: Congraulations

Hello everyone!
Today I will be featuring Mama Elephant's Tiny Ninjas.  I created this card for my boyfriend who received a promotion at his job.  First I used my MISTI to stamp the images I wanted to use with MFT's Extreme Black ink.  I used my MISTI because the images are for the most part solid and did want to chance not having a good impression; the MISTI would allow double stamping if it did not come out right the first time.  After I stamped the images I Copic colored the belts.  I then used an embossing folder by Darice called Bricked Wall on and A2 size white cardstock panel.  I then used the largest die from MFT's Stitched Rectangle Stax 1 to die cut the embossed background.  I also made a frame using the largest and second largest rectangle from the same Stax set.  I also used the largest Stitched Rectangle die cut a piece of acetate, which I embossed with a sentiment from the stamp set. Once I die cut the panel and frams ink blended with Distress Oxide in Black Soot both the frame and embossed panel.  I darkened some areas so it look a bit more dirty. I adhered the acetate to the frame panel.  I adhered the embossed panel to my card base then used one layer of 3M foam tape cut down to the width of the Frame piece  I then used black thread and taped them to the top of my images.  I also used nylon and taped them to the bottom of my images, so that it stabilized them (I also used nylon because it is for the most part invisible).  I then pulled the sting and nylon leaving a big of room for the image to move and stuck them down to the foam tape frame.  After I my images were set I put some sequins in to shake around and then put the frame on top of the foam tape.  I hope you like my card!
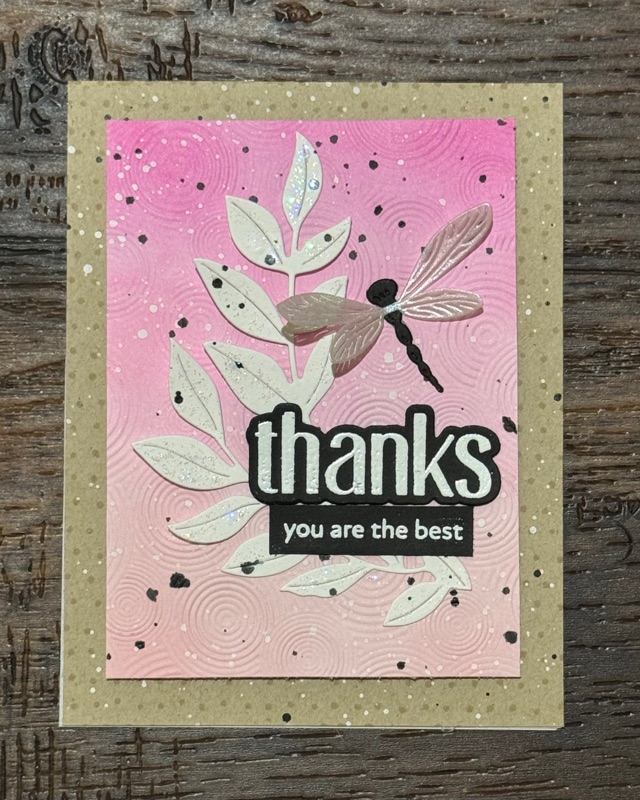

Sunday, April 1, 2018

Neat & Tangled: Be Bold!

Hello Everyone!
I hope you are having a lovely Easter weekend.  Its a bit cloudy today in So. Cal., with the sun coming in and out, but that is okay, it won't deter anyone from Easter egg hunting.  Today I will be featuring Neat & Tangles Big Bold Brew! I've been wanting this stamp set for a while and finally got a chance to purchase it.  I LOVE coffee, so coffee themed stamps sets are so much fun because I can relate.  Every morning I have a nice cup of joe to wake me up.  :)  The card is simple with the main image taking main stage.  I started by using Tim Holtz's Splatter Stencil to ink blend some Ground Espresso Distress Ink to the background.  I used post-it tape to cover areas of the stencil I did not want to use and moved it to the areas I wanted to use.  After I used MFT's Extreme Black Ink to stamp my images on white cardstock so that I could Copic color the images.  A change for me was coloring the boy with blond hair rather than a dark color hair, I usually gravitate to dark colors for hair colors.  The coffee cup is quite large so I used four shades of blue . After I colored the images, I fussy cut it out.  I used Versifine Onyx Black for the sentiment, which came from the same stamp set.  I popped my main images and adhered the hearts with glue.  I hope you like my card.  :)


Hair (YR24, YR 21, Y23, Y11)
Cup (B18, B16, B14, B12)
Coffee (E29, E17)
Skin (E21, E00, E000)
Pants (R24, R22)
Hearts (R89, R29, R24)
Shoes (C7, C5, C3)

Sunday, March 25, 2018

MFT Sketch Challenge 377

Hello everyone!
Today I will be featuring MFT's Watercolor Flowers stamp set.  I haven't done a challenge in a while and wanted to try this week's challenge.  When I saw the sketch I immediately thought of the stamp set.  I wanted to work with inks today rather than color.  I started by stamping the first layers of the flowers with Simon Says Stamp Inks in Sea Glass, Pale Blush Pink, and Lemon Chiffon.  The second layer I used Maliblue, Goldilocks, and Cotton Candy.  The last layer I used Audrey Blue, Sunshine, and Doll Pink.  I used my MISTI to stamp the layers just in case I needed to double stamp; also because I knew I wanted to use Rangers Holographic embossing powder to layer on top of the last layer of inks.  Once I stamped my layers I fussy cut the images.  I then used a piece of Canson XL watercolor paper to do a background.  I started by putting a layer of water onto the paper and using Distress Ink in Cracked Pistachio to pounce some color one, but it wasn't quite looking as I hoped, so I changed my method to the packing technique.  I used both Distress Inks and Distress Oxides in the colors Cracked Pistachio as well as Lucky Clover.  I also used Twisted Citron in Distress Oxide.  Once my smooching was done, I used the largest rectangle in MFT Stitch Rectangle Stax 1 to cut the panel.  For the sentiment I used the Springtime Blooms stamp set to heat emboss in white on black cardstock.  I popped the sentiment up as well as the two larger flowers.  I adhered the smaller flower to the watercolor panel.  The final touch was to add some Jewels.  I used strong adhesive to adhere the panel to the card base as it warped a bit when I water colored it.  I hope you like my card.  :)


Saturday, March 24, 2018

Lawn Fawn: Happy Spring!

Hello Everyone!
Today I will be featuring Lawn Fawn's Happy Village and Easter Party.  I started by stamping the images I wanted to use on white cardstock with MFT Extreme Black ink because I wanted to Copic color them.  I then fussy cut the images.  Then I used the stitched rectangle stax to cut 2 panels with heavy white cardstock.  One of the panel I used stitched Hillside Border die to die cut two grassy boarders, which I then used Distress Inks in Mowed Lawn and Twisted Citron to ink blend.  I then ink blended the other stitched rectangle panel with Squeezed Lemonaid and Mustard Seed.  I wanted a nice bright sky rather than the usual blue.  I then layered the grassy boarders and popping up the top layer.  I adhered the images down popping up the main images.  I used a sentiment from the Easter Party stamp set by using Versafine Onyx Black and Black embossing powder.  I usually don't put anything but a sentiment inside the card, but I had an extra image that I adhered inside.


Sunday, March 18, 2018

Lawn Fawn: Beam Me Up (Scotty)

Hello Everyone!!!
I hope you have had a wonderful weekend.  I have been having so much fun with the new Lawn Fawn release this week.  Today I will be featuring one of the stamp set in this release called Beam Me Up.  I haven't done a galaxy background in some time, so I was excited to create one for this card.  I usually create pretty colorful galaxy backgrounds, but for this card I wanted it to be a bit darker.  I used Stitched Rectangle to die cut a panel that was 2 3/4in x 4 1/8in .  I then ink blended with Distress Oxide in the colors Faded Jeans and Black Soot.  I don't have Chipped Sapphie in the Oxides yet, so I decided that I would need to go a bit heavy with Faded Jeans on the top portion of the panel and faded out or lighten the pressure and ink amount towards the bottom.  I used Black Soot to add a bit of depth.  After I ink blended, I used a drop of acrylic paint in white and a drop of water to mix in with the paint to dilute it a bit so that I could flick the paint onto my panel.  I then took some perfect pearls in the color perfect pearl and added a drop of water to it to create a paint.  I flicked this onto the panel as well (the perfect pearl is beautiful when it hits the light). I then stamped the images I wanted to use on white cardstock with MFT's Extreme Black ink as I wanted to Copic Color my images.  I also stamped the light halo on some velleum using Versifine Onyx Black and embossed it with the new Lawn Fawn Glow in the Dark embossing powder.  I was super excited to try this embossing power.  I then heat embossed a sentiment with Simon Says clear embossing ink with Rangers White embossing powder on black cardstock.  I popped my galaxy panel using foam and multi-medium matt.  I also popped the spaceship and the monster it is carrying up.  I also popped up my sentiment.  I hope you like my card.  :)


Wednesday, March 14, 2018

My Favorite Things: Tweet Tweet

Hello everyone!
Today I will be featuring a card using the Tweet Wishes stamp set from MFT.  I was going to do a one layer card, but decided the card may need some interest.  Most of the background is one layered.  I started out by taping a 1inch boarder all around the card with post it tape to create a mask as I only wanted the center to be ink blended.  I used a stencil I made from the Grassy Hill boarder die to ink blend some grass (Distress Ink: Mowed Lawn & Twisted Citron) then used the cloud border stencil to create some clouds above (Distress Ink: Tumbled Glass).  After I stamped the images I wanted to use using MFT's Extreme Black Ink because it is waterproof and wanted to use my zigs on Bristol paper.  I fussy cut the images and adheared my flowers down to the background and popped up my main image.  I used Versine Onyx Black to stamp and heat emboss a sentiment from the stamp set.  I added a satin sequin as a finish.   I hope you like my card.


Monday, March 12, 2018

My Favorite Things: Itty Bitty Bears

Hello everyone!
Today I will be featuring a stamp set by MFT called Bitty Bears.  These little bears are soooo cute I could not handle it.  I used this set a few months ago for my Christmas card series, but have not used it since and I thought that would be a shame not to utilize the cuteness.  I wanted to incorporate as many bears as I could into the card.  I first choose the color medium I wanted to use to color the images, which was Prismacolor Pencils.  I used craft cardstock to stamp the images I choose with MFT's Extreme Black Ink.  I used my MISTI to stamp them as I wanted to go back later to re-stamp the images.  When coloring with Prismacolor Pencils I noticed the waxy texture of the pencil tends to cover the lines.  The MISTI is such a great took to be able to re-stamp the images to get those lines back.  Once I colored my images I fussy cut them out and began to work on the background.  On another A2 panel white cardstock piece I die cut rows 3x3 of the 2nd to the largest inside/out circle die.  I then used that panel to help guide where I should ink blend my base piece.  I used Distress Inks in the colors Abandoned Coral, Spiced Marmalade, Squeezed Lemonaid, Twisted Citron, Mermaid Lagoon, Salty Ocean, Chipped Saphire, Seedless Preserves, and Wilted Violet.  At first I wanted to use my Distress rainbow background with the circle die cut panel, however my images seemed too dark for this bright piece, so I decided against it and re-thought my layout.  I then decided it would be better on a white cardstock panel as this made the images pop more.  I then used the Happy Duo Die-namics from MFT to die cut the work Happy.  I die cut 3 pieces with black cardstock and one piece of white cardstock.  I layered the black pieces together and put the white cardstock piece on top.  The black cardstock serve as a highlight so that it did not get lost on the white panel.  I popped the bears into 3x3 with the Happy sentiment in the 2nd row.  I then heat embossed the birthday sentiment from the stamp on on black cardstock with white embossing powder.

I still had my original panel and thought it a waste if I did not use it, so I decided to stamp the same Bitty Bears as my first card, but instead of using my Prismacolor pencils on Kraft I Copic colored the images on white cardstock.  I used my white gel pen to add highlights and also used my Spectrum Nior Glitter Pen to add some sparkle.  I then fussy cut the images.  I wanted to make sure the images fit on my rainbow background and circle panel so I laid the objects out.  I popped the circle die cute panel up and adhered my images.  I used a sentiment from the Bitty Bear stamp set which I stamped with Versifine Onyx Black ink.   Hope you like my cards!