Wednesday, December 28, 2016

Christmas Extravaganza!

Hello everyone! Christmas was such a great time; spending time with family and of course all the Christmas cards I was able to make.  :)  This was the first year I tried making cards for teachers I work with often and staff that I communicate with on a daily basis.  I was fun trying to come up with ideas and actually creating the cards.  I decided with the amount of cards I had to make for everyone that it would be best to make mini cards, which were about 4x2.75 inches.  I made a total of 30 cards with 22 designs.   I forgot to take photos of the last couple of cards that I made for my sister to give to her children's teacher and the cards I ended up sending out to my friends - party fowl :(.  I started making the cards in September and slowly worked on them through out the couple of months.  It was a slower process as I had to squeeze in time to make so many, mainly because I also had a Scrapbook Project I was commissioned to make for a co-worker.  I had a few Christmas stamp sets, but found ways to stretch my other stamp sets to fit the theme.

The stamps sets I used are:
- AmyR Stamps: Snowman Sentiments
- AmyR Stamps: Happy Christmas Sentiments
- Avery Elle: Home Sweet Home
- Lawn Fawn: Cheery Christmas
- Lawn Fawn: Home for the Holidays
- Mama Elephant: Raindeer Games
- Mama Elephant: Girlfriend
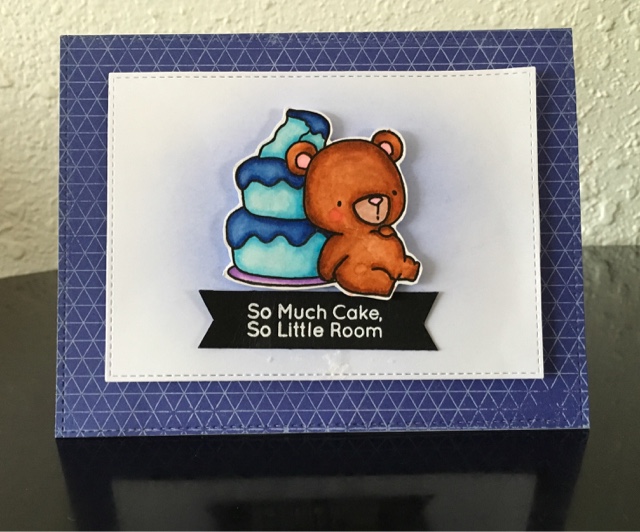
- My Favorite Things: Beary Birthday
- My Favorite Things: BB Beast Friends
- My Favorite Things: BB Lucky Dogs
- My Favorite Things: BB Santa's Elves
- My Favorite Things: BB Jingle All the Way
- My Favorite Things: BB Somebunny
- My Favorite Things: LJD Home Yourself at Home
- Paper Smooches: Bitty Bungalows

Here are the series of cards...


Saturday, November 19, 2016

Birthday Fun!

Hello everyone! I have been doing a horrible job at keeping up with my blog :(.  I really need to improve on it because I do like sharing my process in making cards.  I find inspiration from many of the marvelous card makers out there through reading their blogs, Instagram, and other Social Media posts.

 I have two cards to share today, one I made a two weeks ago for a co-worker's birthday and another for one of my closest friends.  Both cards I mainly used MFT products.  I had a bit of a brain fart when I was trying to come up with a card for my co-worker, so my color combination is a bit off :/, but I made it work.  I used MFT Myrid Background to do a emboss resist technique for the background using Versa Mark ink and Rangers detail white embossing powder.  I then ink blended cracked pistachio onto the background.  I Copic colored and fussy cut the images, MFT Beary Birthday (the bear) and Lawn Fawn Cheery Christmas (the presents) for my card.  The sentiments I used came from the Beary Birthday stamp set as well as Amy R's sentiment, which I embossed onto vellum.   Here is the card...

This next card I made for a close friend of mine. :) I used MFT's Adorable Elephants for the main images.  I choose this set specifically for the tiny butterfly as my friend loves butterflies.  I created a grassy boarder stencil using MFT's Grassy Boarder dies and ink blended a  hill using distress ink in colors Mowed Lawn and Twisted Citron.  I used the negative side of my stencil to mask my grassy hill so that I could ink blend the sky with Salty Ocean.  I Copic colored the images I used for the card.  The sentiment I used came from the stamp set, which I embossed onto black cardstock.  Anywho, here is my card...

I hope you like the cards I shared today.  Currently, I am working on a series of mini-cards for Christmas, so far i have 17 mini-cards made.  Once they are done I will share parts of the process, as there are too many of them to share how I made all of them.  If you would like to see them check out my Instagram page: Smiles Crafty Cardz Instagram.

Sunday, August 28, 2016

You're Amazing!

Hello everyone! Sorry I've been away from blogging and making cards.  :/ Its been busy couple of weeks, so I was unable to make any cards.  I had good run while I as on summer break but I had a little mini vacation to Northern California where my boyfriend lives before the start of the new school year.  I was unable to bring my card making supplies as I was taking the train and had limited space in my luggage to carry anything.  Then the school year started so that has been a rush of getting things ready.  Hopefully everything will settle soon, but life has a way of throwing stuff at you.  :P

The inspiration for this card came from starting the new school year and all the tasks educators have to do go get ready for the school year.  I LOVE my job and making an impact on my students life particularly because I work with youth whom have come from a very tough background.  The program I am involved in helps these students try to cope with their issues and build skills to take with them as they move on to their next journey.   Also, to guide them into graduating High School, as many of our students are quite behind in credits.  The change I see in our students from year to year makes my job worth while.  It can be hard a times, but is very much gratifying.

My Favorite Things recently had a 50% off retirement sale! I went a little crazy with this sale, how could I not, it was a steal.  I bought quite a bit of background stamps, which I have been wanting to invest in, this was a great opportunity to start building my stash of background stamps.  I also purchases a couple of the older sets, including You're Super! When I saw this set I had a couple of ideas in mind, but I thought it fitting with the new school year starting to make a teacher one.  I want to build that stamp stash too, I don't have many teacher stamps.  I wanted to make my own "pattern" paper using my stamps.  I used My Creative Time with Emma's, Build a Chevron Background, stamps to do this.  That stamp set is so versatile as there are 2 different thickness of chevrons and 2 different patters to go along with the thick chevrons. I used a medium grey cardstock with Simon Says Fog ink to create a tone on tone background.  I then stamped out the girl image to Copic color.  Once the copic coloring was done i fussy cut the image and went on to the panel piece.  I used Gina Marie Designs Scalloped frames (I used the smaller of the two), because I wanted the inside piece with the scallops for my panel.  I stamped the skyline using my MISTI; it was a solid image so I was afraid I would get a good impression which i didn't in the first go around, so the MISTI was great in having to re-stamp the image.  I also created a mask using full adhesive post-it notes from the skyline.  I masked the skyline so that I could create a distress sky using Victorian Velvet, Seedless Preserves, and Chipped Sapphire.  After I was done distress my background, I used red cardstock to emboss my sentiment in detailed white powder.  I cut the sentiment out with one side straight and the other side with a fish tail.  I then put the card together popping up the Girl image.  Anywho, here is my card... :)


Winner of Makerpop Challenge #102: Encouragement


Tuesday, August 9, 2016

Home Sweet Home

Hello everyone! It's been a very slow couple of days for me particularly in card making. I was having a bit of a slump for ideas, then I saw MarkerPop's new challenge: Anything emboss (dry or heat). Once I saw the theme I instantly thought about doing a emboss/resist technique, but what to emboss/resist.  It was then i realized I wanted to make a card for my boyfriend's mom who just moved back to Bay Area from Seattle.  I thought maybe I could do a skyline of San Francisco with a distressed night sky.  The ideas kept coming, I remembered I have a Clearly Besotted stamp set with critter heroes and there is one image is of a turtle helicopter that could be flying over the Bay toward the San Francisco skyline.  I totally forgot to take pictures of my card making process as I was working on the card.  :/   Sorry! Hopefully you can get the steps I'm going to explain.

First, I did not have a die for the San Francisco skyline, but I do have a Cricut that could cut one out.  I looked online for the Skyline and converted the image into a SVG file (a cut file compatible with most cutting machines).  I used Chalkboard cardstock because I like the texture and color (its has a slight sheen to it) of the black to cut the skyline.  After, I used that as a guide as to where I wanted it position on my panel.  There had to be some water represented as the bay, so I penciled in a line where I wanted it to be.  Once I had an area for the Bay I used the Skyline cut out as a guide for me to put my stars and moon onto the sky.  I used the star and moon images in the set.  I also created a moon mask as I did not want it to be the same color as the sky.  Once that was done I heat embossed it with Rangers detailed white embossing powder and heat set it.  I then masked off the top area of the panel with painters tape, so I could start distressing the bay.  I used a combination of Salty Ocean and Peacock Feathers.  I wanted Salty Ocean, which had a blue tint to be the color of the middle of the bay with Peacock Feathers being on the outside.  I kept some areas lighter to create light shadows on the bay.

Once I finished distressing the Bay, I took off the mask and used it to cover the water area so I could work on the sky.  I put on a mask for my moon so that it would not get distressed in.  I used a combination of chipped sapphire, seedless preserves and salty ocean.  The key to doing the night sky is to blend the edges with each color very well.  I went back and forth between the colors until I liked how it looked.  After which I took the mask off the moon and used mustard seed and squeezed lemon aid to distress the moon..  I loved how it turned out because I blended in some of the yellow color into the sky so that it looks like moon is beaming with light.    When that was done I still wanted more from the sky, so I masked my moon and Bay again as I did not want it to get anything on it.   I put some white acrylic paint on my acrylic block and watered it down, so that I could flick it onto the sky to create more stars! :) My first time using this technique, actually my first time making a night sky.  :)  I then heat embossed my sentiment onto the bay, as well as piece down the skyline and my turtle image, which I Copic colored onto the panel,  I had a lot of fun making it and it didn't take too long to make, if I didn't have a clear idea of what I wanted to do this would have taken much longer.  Anywho here is my card...


Saturday, August 6, 2016

MFT Sketch 292

Hello Everyone! :)  I've been wanting to enter in some card challenges, but have been intimidated by all the the beautiful cards.  Also, I'm a very free flowing card maker, so its hard for me to come up with ideas when there are criteria (I'm trying to work on this).  I think I've mentioned before I usually don't have an idea of what I am going to create going into making a card, it usually just comes to me as I work, which makes for a very long process.  I pull inspiration as I create.  However, I want to challenge and push myself out of my comfort zone, I also really want to reduce the amount of time I spend making a card and having a direction before beginning a card could help. I think Challenges can help organize my creative process.  :P

The card I  made is for the MFT Sketch 292 Challenge.  MFT has Sketch Challenges every Wednesdays; they also have other challenges throughout the week as well.  Here is the sketch:


When I saw the sketch I was just about to give up on it as I do not have square frames or any square dies, but I made it work and experimented with what I had.  I used Gina Marie Designs: Scalloped rectangle die.  I measured a 4x4 square and partially cut the rectangle die on one end and match the die up to the grooves to the other end to create a square.  I of course did this on scratch paper first and when I got it right I die cut it on my white card stock.  I wanted to create a frame from the die cut so I lightly outline the inside of the square to use an xacto-knife to cut out.  After which I put the frame on my base to trace the inside square so I knew where I wanted my scene to be.  I used MFT's Sketch Blooms stamp set as well as various colors of Simon Says Stamps inks to create a flower scene.  I then used salty ocean distress ink to ink the background of the square.  I then placed the square frame onto the card.  I felt there was something missing; I've been wanting to use BB Adorable Elephants and thought this would be a great time to break it out.  I Copic colored one of the elephant images as well as a butterfly.  Once the coloring was done I popped the elephant up with foam tape and added some sequins.  The sentiment comes from My Creative Time with Emma: You Are Fabulous.  Anywho, is my card...


Wednesday, August 3, 2016

Art Impressions: Flying High

Hello everyone! :) It's hump day... HUUUUMPPP DAYYY... lol That gets me every time, I am always reminded of the Geiko commercial.  I hope everyone is having a fabulous week; its been hot hot hot here in sunny California, trying to stay out of the heat.  I've been enjoying my summer break thus far, relaxing and organizing while I can; also spending time with the family.   What I have been enjoying most is being able to craft! I Finally had the time to clean out the backroom to make space for a craft area and storage for my crafty items; it was a mess before, but now I have a proper space to put everything, which makes it a breeze to get to.  There still much to go in setting up the space.  My sister is donating her office table and shelving unit to me because she is redoing her office area of her home so that her children could work in there as well.  :)  I got super lucky! YAY to my sister! Until then, I will be working at the kitchen table, but at least I have my craft items stored in the backroom, so there's not a big mess on the dining room table.

Anywho, I was able to have some fun with my Art Impression stamps yesterday.  I was experimenting a bit with the background; it did not turn out how I wanted at first so i had to fix it.  I think it came out okay after, not one of my greatest work, but I had fun creating.  First, I used Gina Marie Designs: Wonky Stitched rectangle die to die cute some Strathmore: Watercolor paper.  I can't tell you how much I love Gina Marie's die's; they are unique in the sense that she comes out with different types of boarders/shapes for her dies, particularly her nested die.  It also helps that the price range is incredibly awesome! Check her out at Scrapbook Outlet: Gina Marie Designs.  After I die cut the watercolor paper I used my MISTI to stamp my image.  I used Art Impressions: Flying High with the lady and man flying in the airplane; it is from the His/Her Series.  Does anyone know if they have names? I've been wondering if they did because I just started using Art Impressions, so when I write my blog about them I always want to put their names.  I had to re-stamp the image about 3 times to get a nice clear (the watercolor paper has a bit of texture, so some spots were not stamping well).  That's why I love using the MISTI, on textured paper like this its always great to be able to stamp it over again to get a better image.  Once I was satisfied with the clarity of the stamped image I used my ziggies to color the images.  I usually use a watercolor brush with i use my ziggies, but I wanted to see how it would look with just the marker color themselves.  Oh man, these color medium has so much color pay off, I had to adjust my color pallet a bit by choosing lighter colors.


 Once I finished coloring the image, I moved onto the background.  I had a bit of trouble with this as I wanted to create some texture using the Zigs, kinda like clouds, but that did not work out and I had to try to find a way to fix it.


I used my aqua brush to lighten and lift the sky blue color I used as much as I could, but still leaving a tint.  I then used my distress inks to create clouds.  It ended up better than before.  I used versafine embossing ink to emboss the sentiment in red.  I used fun foam to pop up the panel onto the base and popped up the sentiment.  Here is the finished card...


Monday, August 1, 2016

Markerpop Challenge: Create a Scene (Art Impressions: His/Her Campers)

Hello Again! :) Trying to get my blog updated with the previous cards I made.  I spent the week with my sister and her kids, so it was a bit hard to get my cards up on the blog.  Love spending time with my nieces and nephew, was able to visit my brother and his family as well.  My sister, sister-in-law, and I made some time to work out one morning before the kids woke up.  We went to a place called Orange Theory, which uses interval training consisting of rowing, treadmill, and weights.  Oh man, did that place kick my butt.  It was a lot of fun though and boy did I get a burst of energy after that.  (I wish I could put emoji's on here, would totally insert some sort of exercise emoji :P.) Well I have digressed from my card for the Markerpop Challenge.


Markerpop has a biweekly challenge on their blog; each challenge there is a theme and this biweekly theme was Create a Scene. I used my Art Impressions stamps and chose His/Her Campers to create a scene.   I wanted to do a one layer card so I had to decide on a layout as there is not much leeway in moving images around with a one layer card.  I choose to stamp the dog first, then created a mask for the dog so that my lady would not overlap the dog, once the lady was stamped, I also created a mask her her to stamp the camper in the background.  I also created a mask for the camper for later use (I wanted to create a distress background).  I used my copic markers to color the images in.


After coloring the images, I used all the masks I made for the images so that I could create the background using distress inks.  I realized I needed another mask for an area in front of the camper where I wanted dirt to be so I hand drew a mask for it.


For the bottom area, I created a grassy area by first inking with twisted citron, then I used cut  outs of MFT Grassy boarder to distress on grass with mowed lawn.  I then made a cloudy sky using Lawn Fawn Puffy Dies (I have stencils made for these as well as the grassy boarder).  I then used gathered twigs to create the dirt area in front the camper.  Once i was done distressing my background, I took off all the masks.  I thought the dirt needed a little more texture, so I used a Copic marker to create the texture dirt.  Anywho, here is my finished card for the Markerpop Challenge...


Update 8/9/16
I had so much fun creating this scene for the challenge and did not think I would be chosen for TOP 3! I was super surprised to find out my card was Top 3.  Super happy right now!

WoHooooo I made it to the Top 3 on MarkerPOP Blog

Cards for my sister.... Prayers & Housewarming

Hello Everyone! Sorry I have not been keeping up with my blogging. :/  I have made a few cards since my last post, most have been requests from family members.  :) Love making cards for my family especially when they have an idea in mind of what they want, makes it a bit easier for me to create with a guide.  :P

My sister text me last week asking if I could make a sympathy card for one of her close friend whose dad just past away.  :( I was really sad to hear the news as I know this friend and have known her since I was a kid, so it was unfortunate news to hear.  I had an idea of what I wanted to do as this idea had been lingering in my head since I received the stamp set, but who wants to make such a card without thinking about of someone passing (sad times).   I usually don't make sympathy cards until I have to.  For this card, I used Mama Elephant's: Organic Blooms stamp set and Gina Marie Designs: Prayers die.  I was on a ziggy craze when I created the card, so I of course gravitated towards it was my color medium.  First I die cut my base from Gina Marie Designs: Scalloped Stitched Rectangle die and masked off all parts after the stitching.  I used my MISTI, since this is a fairly large stamp to stamp the image with VersaFine Embossing ink and heat embossed it with Ranger Detailed White Embossing powder.  Luckily, I used the MISTI because some of the parts did not stamp well so I was able to go back to touch up those areas.  I LOVE the MISTI; so glad I finally got one. this card would have been ruin had I not had the tool.  I then used my Ziggies and a water brush to color in the image.  I was going for something a bit softer for the card.  Here comes the fun part, scary, but fun.  I had been wanting to try in-lay die cutting but with dimension, so I used the Prayers die to cut through my finished watercolor piece (scary because if I messed up all the work that I had gone through would have been in the trash bin).  It worked out though!  I cut 2 more Prayers die cut to layer up and put back into the card.  AHHHH! I Loved how it turned out.  I then picked a sentiment to go with the die cute and embossed it with detailed white embossing power on black card stock.  Here is the finished piece...


My sister also asked me to make some housewarming cards for her husband's sister and brother, who both recently moved into their new homes.  I at the time did not have any stamp sets with the theme, but quiescently I found some on a Facebook group I am in that sells second hand stamps (most of which are almost brand new!) and at a great price.  For these cards I used Paper Smooches: Bitty Bungalows and Avery Elle: Home Sweet Home (for the sentiment inside the card).  For this card, I thought I would break out my Copics, as I haven't used them in a while.  I stamped and color the images, then fussy cut them out.  I saw that I had the inside pieces left of a inside scalloped circle die from a previous card which I used Lawn Fawn pattern paper.  I used those pieces to highlight the houses on my card.  This was a fairly simple card as I had to make two so I didn't want to make it too elaborate.  I used black cardstock to emboss with detail white embossing powder the sentiment and cut fish tails at the end.  I popped up the house to make it stand out a bit.  Anywho, here are the cards....


Saturday, July 16, 2016

So Much Cake....

Hello Everyone! I've been having a lot of fun participating in The 30 Day Marker Challenge this past week.  Trying to get as much coloring as I can while cleaning out my back room area to make room for my craft area! I'm super excited to finally get a craft area in the house instead of working in the dinning room area.  I'm sure everyone in the house would appreciate that they can finally eat on the dinner table again.  :P  It was a total mess back there, we had so many boxes.  I had to sort out everything to donate and things to throw out.  But it's almost done!

I did some coloring when I took breaks in cleaning the back room.  Of course I went back to MFT's Beary Birthday.  Those darn bears get to me; I love the Birdy Brown line from MFT.  I wanted to use my Zigges (Clean Color Real Brushes) to color them in this time.  I used Bristol Smooth paper because they work so well with the Zigs.  Here was the result of my first go around of these bears....


The coloring was just okay, the first go around.  However, there was a lack of contrast and shadows and I did not like that; so I re-colored them using a darker shadow color.  I also, re-outlined each image (Kelly Letevola does this with all her images; I can see why now); it made the images pop with the bold outline.  I felt better about them after that.  :)


So, I had these bears that I had been working on all week and  one of them needed to be put onto a card, right? I spend so much time coloring them, I didn't want it to be too busy.  I used White Pigment ink and MFT's Grid Pattern Background to create a background on dark blue card stock (to match the color of the cake).  I kept it simple, and ink blended some Shaded Lilac distress ink onto white card stock that I die cut from MFT's inside/out stax rectangles, where the bear was going to be.  I white embossed the sentiment on black card stock and cut fish tails on the end.  I popped up the bear onto the white carded with the Shaded Lilac with the sentiment.  I then popped the panel onto the Grid Pattern blue card stock.  Any who, hope you like my card.... :)


Sunday, July 10, 2016

Surprise! & 30 Day Marker Challenge

Hello Everyone! Hope your weekend is going well! I am super excited about all the new releases and crafty goodies I've been getting.  :)  Last weekend there were so many deal with 4th of July and of course MFT's 10 year anniversary release.  :)  Broke the bank, but definitely worth it.

Well first, I want to say I have been behind in the 30 Day Marker Challenge put on by Kathy Racoosin.  What a wonderful challenge!  The challenge encourages you to use all types of color mediums, sometimes mediums out of our comfort, which is awesome.  Everyday for 30 days you color anything you want and share what you have done.  :) It is currently on day 6.   It has been fun to see all the crafty people in instagram post their coloring projects.  If you want to participate and share on social media remember to #thedailymarker30days.  Also, check out Kathy's blog, The Daily Marker.

For today's card, I was inspired by Amy Lee aka The Craft Bunny, MFT design team post for their latest release (you can find her card here: Amy's MFT Day 4 Card).  I started coloring MFT's bear image yesterday.  The set is super cute!  It was also my first day participating in the 30 Day Marker Challenge (I totally forgot to put it on my instagram page though :/).  I used my copic markers as my color medium.  I totally messed up my first coloring image (colored the box top the same color as the bow; also didn't like how dark my bear was), so I stamped another image and recolored it.  I used MFT's new big balloon die-namics to die cut the balloons.


I finished the card today by using distress inks to ink blend the balloon and using stencils I made from Lawn Fawns, puffy cloud boarders, I created a cloudy background.  


When i was done with the cloudy background, I thought it was too dark and over took the card (I used Broken China distress ink, should invest in Tumbled glass for this technique, it is a softer blue).  I didn't want to throw it out, so I though using vellum would soften the clouds a little more.  Anywho, here is my card....


Sunday, July 3, 2016

Thinking of you...

Hello everyone!!! This card is a special one.   I made it for my BF to celebrate pur anniversary!  Of course I wanted him to see it before I post it.  It's one of my favorite cards I've made this far, maybe my best :P.   I used MFTs Somebunny and Snuggle Bunnnies for the images (used my ziggies to color them).  I am a bit obsessed with those zigs as a color medium right now.  I used Gina Marie Designs reversed scalloped dies for the border as well as the cloud and sun.  I used the middle section of the boarder die to create my background pieces using distress inks.  I also used the Sparkle pen to put a little shine to the Sun.  Anywho, here it is :)


Saturday, July 2, 2016

Hello...

Hello everyone!!! Hope your 4th of July weekend is going great so far :).   I am having soooo much fun with MFT hog heaven stamp set if you haven't noticed :P.  I have a couple more cards in mind for it, hopefully I have time to actually make them.  I didn't use too many techniques with this card.  It's pretty clean card with good amount of white space.  I usually do some sort of ink blending with my cards but wanted to do a quicker card.  You have to have a lot of patients for ink blending and building the color which I'm still working at.  One day I hope to blend ink just like Laura Bassen (who am I kidding she is the Queen of ink blending), 1/2 her skills would suffice for me.  I thought I would do more of an interactive card and been wanting to use the back of the pig.  So the front of the card is the peep pig on the fence and the back is him standing on the wooden steps to promp him up to say hello. I made it a top folding card but realized when I was done it probably would have been better as a side folding card (:( oh wells).  I also have a little boo boo mark on the front of the card from glue :( (need to get one of the sandpaper erasers for such occurances).  I used my ziggies to color the images and Gina Marie Designs inside scalloped die.  Also put some sparkle pen on the flowers.  Any who here is my card :)....

Front of card

Inside the card
  

Monday, June 27, 2016

Get carried away...

Hello everyone!!! Back again with another card :).  I have been having fun this weekend making cards.  I used MFT snuggle bunnies images that I Copic color a few weeks ago for the Copic jump start class.  I put it aside because I wasn't sure how I wanted to use it (I kinda forgot I had them as well :/).  Yesterday I was cleaning my craft area and saw them and had to make a card from it.  I got inspiration from Lauren Bassen on distress color combinations (spun sugar, picked raspberry, spiced marmalad, and squeezed lemonaid).  I used an older hero arts background stamp to do a emboss resist.  I'm trying to build my birthday card stash so I wanted a birthday sentiment, so I used mama elephants go get carried away.  My bunny needed some balloons to get carried so I used MFT somebunny ballon and masking to create a bundle.  Anywho, hope you like my card :)


Sunday, June 26, 2016

Ham it up...

Hello everyone!!!!
I am really loving the hog heaven stamp set right now and have been getting a lot of inspiration from the crafting blogs and YouTube videos I subscribe to.  It's been so much fun playing with all my crafting supplies.  Anywho, I'm not sure if you notice but I love creating scene cards particularly sunny outdoor scene cards :P.  Maybe the sunny Southern California weather is getting me in the mood.  :) I finished this card in a jiffy because I sorta had something in mind for it.  I usually don't have a layout in mind which makes the process take a lot longer.  Most times I just want to craft and go along for the ride; gets a bit messy though.  I am a bit short on birthday cards so I wanted to make it a birthday themed.  When I saw the wooden door I knew I would be able to use my mama elephant fence die (been wanting to use it but haven't had a chance).  I used the negative for the fence die as a guide for my distressing boarder from the sky to the grass area; seemed to work out well.  I've been using distress inks a lot for my background lately because I am really bad at picking out pattern papers :/, probably why I do a lot of Scene cards instead of sketches :P.   I used Gina Marie Design dies for the scalloped rectangle and clouds.  I am really loving her dies!  And she has the best customer service.  :) So during my card making process, I almost made a very big boo bo when putting my sentiment on.  I had already adhered most of my elements down when I realized I needed to put on my sentiment.  I used wet glue instead of my tape runner adhesive so there was not way I was going to get it off without ruin the elements :(.   Let's just say when I put my sentiment on there was a nice gap in the middle where it didn't stamps. If I had the misti that probably wouldn't have happened.  I almost trashed it until I realized I have a inkadinkado stamp positioner.  I didn't get it right on the dot but it was good enough where I didn't have to throw it away.  Anywho, hope you like my card...


Saturday, June 25, 2016

Friends till the end...

Hello everyone!  I'm getting so much inspirations these days that it's helping me with my card making and I'm having so much fun!   For this card I used distress inks to create a colorful background and used MFT's hog heaven. I'm loving this stamp set, it's just so cute.  I used my zig clean color real brush markers to color the images in.  Very simple but colorful card.  I wanted it to be rainbow color but I don't have a purple distress ink color :(.  I'm still learning to build that distress color ; not getting the really bright colors I want yet and my arms are getting tired :P from the distressing motions.  Anywho, here is my card...


Friday, June 24, 2016

You make me smile...

Hello everyone!  I recently invested in some zig clean color real brushes and wanted to try them out. My inspiration came from the old school poloroid instant films that you have to shake to get it to develop. The only non critter set I have is mama elephant's up up away. The girl and boy in the set are suppose to be holding a balloon but it also looks like they are jumping up (reminded me of when people do th jump pose for photos).  I used Bristol smooth white cardstock to stamp my images and of course the zigs to color them in.  I used my cricut machine to cut a heart stencil so that I could ink blend it with firebrick distress ink.  I saw Tera Sell recently do a large pokadot ombré look with just one distress color and wanted to try that.  I love her YouTube videos.   I used MFT snapshot for the sentiment and smile die cut.   I also ombré the smile cut with picked raspberry distress ink.  You can't see it in the picture but I also used spectrum noir clear overlay all over the smile cut.   Anywho... Here it is...


Looks better when it's standing :) I also added some sparkling clear sequins  :P

Tuesday, June 14, 2016

You get me...

Hello everyone!  I totally forgot to post this last week when I made :(.  I am taking a Copic class with Sandy Allnock called Copic Jump Start, which is an introductory course on Copic coloring.  I am learning so much on how to match colors, light source, and utilizing the colors you have to make colors or create shadows.  Last week I was practicing light source and shadows with the Snuggle Bunnnies stamp set from My Favorite Things.  I had some good images and thought it would be a waste not to use them so I made a simple cared from some of the images.   I am also posting my practice images as well. :) I used some Gina Marie Designs and MFT dies to create the background and blended with distress and Simons Says inks.  Hope you like what I created. 


Tuesday, June 7, 2016

Donut worry...

Hello everyone!  I haven't made a card in a week!  I usually have at least one card in the works every couple of days but I've been busy with other projects and helping my bf move.  Right now in in the middle of making my nieces birthday present but I really had an itch to make a card so I made something simple (literally took me 15 mins to make). Hope you it you like it.  

Thursday, June 2, 2016

Window peeker....

Hello again!  I recently bought some stamps from doodlebugwa (they had an awesome Memorial Day sale I could not resist). I purchased the Mama Elephant carried away stamp set and a couple more but for this card I used the Mama Elephant set.  I've been meaning to use my window die set from Gina Marie Designs; when I saw it I had so many things in mind for it and one was a window peeker.  So when I sat down yesterday to start working on the card I knew I wanted to use the window peeker with Mama Elephant.  I wasn't quite sure how I wanted the layout to be as I gathered my materials I had an aha moment and thought how about a inside window peeking out card; when opened you get an outdoor scene.  I LOVE the way this card turned out.  The only things is it doesn't leave much room for personal writing.  :/ I'll have to figure something out for that.  Here is the card...


Loads of fun...

Hello everyone!  I finally got to using some of my markerpop stamp haul I received a couple weeks ago.  I actually made this card last week but been a bit busy to get it up on the blog.  My nieces birthday is next week and I thought I'd make her a card.  She's very much into pink and "girly" colors so I wanted to incorporates those types of color.  I wanted it to be bright and fun just like her!  She is full of energy and silly as well, which meant a fun interactive card.  Shaker it is!  I've made a shaker previously but that was using a fuse tool; this time I built the shaker from die cut foam and transparency.  I watercolors my images and fussy cut them out. I had a tough time getting the foam and transparency to glue down (made several attempts at this it just would not hold).  Also my foam was getting pretty smashed by my big shot so I had to cut a couple layers to get enough dimension to add beads and sequins, but I finally got it.  Here it is...


Wednesday, May 18, 2016

Somebunny...

Hello!  Been on a card binge.  I'm loving it.  I made a circle card this time using MFT's Somebunny stamp set.  I started this card last week when I watercolors the images, but I was waiting on some of my dies to come in so that I could complete it.  :). I did some ink blending with my Simon Says inks; sill learning how to do this.  Some days I'm like yes I got it and other days like today I feel a bit defeated.  The messed up with too much pressure on the dark blue but at that point I did not want to start over on the ink blending.  I added some sequins to take the eyes away from my mistakes of blending.  Anywho, here is my card.


Monday, May 16, 2016

Baked with Love

Hello again!  I'm in a good card roll today.  I loved how this turned out.  I'm working on my ink blending.  The idea for this card actually came abouts when I was at work when I was eating some baked goods.   I love food, and food stamps!  I was thinking about the baked with love stamp set by lawn dawn and wanted to use them. I thought it would work so well with my MFT recipe for happiness chef Francois.  I thought about doing a story board with him but the images are quite bit (maybe in the future when I get smaller images).  I was able to do a two scene card.  Here it is...